Tampilkan postingan dengan label Valentine's Day. Tampilkan semua postingan

Rabu, 05 Juni 2013

Elephants on the Brain

I've got elephants on the brain... or uh... on the brush, I mean.  These little watercolors are so fun to make and they have sold really well, so I had to make more!    There must be a lot of nursery decorating going on out there and these are perfect for it :)

You can check out my Tutorial for Stenciled Watercolors if you want to make your own.

And here's a new design.... a little blue bird.  What do you think?  Maybe do this one in different colors?  

Rabu, 13 Februari 2013

Love Rocks


I have an endless supply of rocks in my yard.  I may as well turn them into something pretty!


After washing and drying, I drew hearts on my rocks with markers (some washable, some permanent).  Then I gave then a coat of Modge Podge to seal the designs and shin-i-fy them.


I'm planning on leaving these little love rocks around my neighborhood for unsuspecting people to find once the weather cooperates.  I can't leave them in the snow, so it may be a while. Until then, I'll leave them here and wish you all a Happy Valentine's Day tomorrow!


Senin, 11 Februari 2013

Photo of the Week


Gummy bears anyone?  I was so sick over the weekend that I didn't get out at all and I think I may be going just a little crazy.  I've taken to playing with my food (and eating it of course) to keep me entertained.

I made hearts out of play dough last year so I think I'll start a little tradition here of taking photos of random items shaped into hearts every Valentine's Day. What do you think?

Rabu, 06 Februari 2013

Reverse Applique V-Day Tee


I've been wanting to hunker down and practice my sewing skills this winter.  The weather is still cold out so I have no more excuses, except for the fact that sewing can be hard on my back.  Not so fun.

For now I have to stick to quick projects, so I tried out another reverse applique on a t-shirt.  I picked an old one to do this on just in case it didn't turn out, but I was pleasantly surprised!


Now I have something fun to wear on V-day!  Hooray!

If you've never tried the reverse applique technique,  you can check out a great tutorial HERE.  

Kamis, 31 Januari 2013

Striped Heart Watercolor Tutorial


I just love hearts..... I can't get enough of them.   I can't get enough of watercolors either, so this project is a perfect combination of both of these loves :)

  Here's my simple tutorial for making your very own unique Watercolor Valentine's Heart Art.

Materials:
scrap paper or heart stencil
watercolor paper
watercolor paints
paint brush
pencil
ruler

Step 1:  Cut out a heart or use a stencil or cookie cutter to fit the size of your watercolor paper.  I used some junk mail to save paper :)

Step 2:  Place your heart stencil on the center of your watercolor paper and lightly trace the outline in pencil.


Step 3:  Using a ruler, lightly draw horizontal lines across your heart drawing to create sections.  You can draw as many lines as you would like, but I think it looks nice with four sections.


Step 4:  Pick out four colors (or as many as you need to fill the sections you drew) to fill in your heart.  If you are mixing colors, make sure you mix enough to fill an entire section.

Step 5:  With the color of your choice, paint in the top section of your heart drawing.  Then, fill in the other sections below it with different colors leaving a small space between the sections.


Tip:   If you want your lines to be clean and distinct, wait for each section to dry before painting the next section below it.  Personally, I like it when the paint mixes a little between the sections, so I painted one right after another without letting them dry first.


Step 6:  Let your heart painting dry and don't forget to sign your masterpiece!


These would be great as Valentine's cards too.  Hmmm...... maybe I'll do that next year.  I've already made cards for this year.

Happy Painting!


Selasa, 29 Januari 2013

Colorful Crochet Hearts

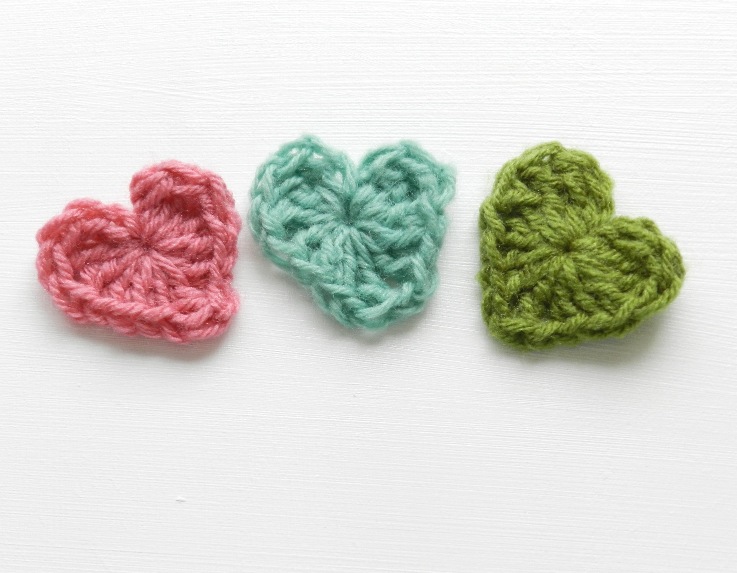
It's my first time making crochet hearts....


They're really easy and fun to make!  I followed the tutorial over at Cornflower Blue Studio. It's a really good tutorial, so you should check it out.


Then I had to turn all my colorful little hearts into a garland, of course. They make me happy!


Selasa, 15 Januari 2013

Watercolor Resist Valentine's Cards


Last week my son and I experimented with watercolors and crayons to make some crayon resist Valentine's Cards!  They may look a bit amateur- ish, but they were fun to make!  Plus, nothing beats a home made Valentine's card :)

Here's a simple tutorial I put together for you:


Materials:
white card stock or watercolor paper
white crayon
watercolor paints
paint brush

Step 1:  Draw a design or write a Valentine's message on the front of a folded piece of white card stock or watercolor paper.  This is kinda hard to do because you can't see very well what you are drawing or writing.


Step 2: Load up some watercolor paints on a paintbrush and paint over the area you just drew on with with crayon to see your design come to life!


Step 3:  Let the paint dry and add any other embellishments you like.


Selasa, 07 Februari 2012

Starched Yarn Hearts


I decided to try out a new craft idea I discovered at the Disney Family Fun website..... Starched Yarn Hearts!   I thought my three-year-old would want to help me make these, but alas, he was more interested in playing with water in the sink.  Kids are funny that way!

I think they turned out ok in the end, but man, this was a HUGE mess to make.  The instructions basically involve combining cornstarch and water, dipping pieces of string in the starch and shaping them into hearts using a cookie cutter.  Great concept, but the starch stuff was incredibly messy and once it cooled, it turned into huge globs.  At that point it was pretty hard to get the string saturated. 

So, if you want to try this one out, consider yourself warned.. It's Messy!  I also had to adjust the cornstarch/ water ratio.  I used 1 1/2 cups of water for 1/4 cup of cornstarch.  I've heard of others using fabric stiffener or even elmer's glue.  Those probably work better.


I let the hearts dry for a good 24 hrs on some parchment paper and then strung them up for some simple Valentine's decor for my apartment.  I actually had more fun photographing them than making them- hehe!


Jumat, 03 Februari 2012

Valentine Goodies: Bookmarks

I've had all these left over scraps of watercolor paper laying around and up until last night, I had no idea what to do with them.  But, being the saver of junk that I am, I kept those lovely little papers knowing they would come in handy one day..... and they did!   Take a look....


......bookmarks made with stamps, colored pencil, colored paper, and ink on watercolor paper!  I even laminated them using packing tape. 


 I know that good old fashioned bookmarks may be becoming extinct since the birth of e-readers and tablets, but I still like them.  I use my husband's kindle every once in a while, but I  will never give up reading physical books and using physical bookmarks.  There's something satisfying about handling an actual book and turning actual pages.


Senin, 16 Januari 2012

Paper Hearts on Clips


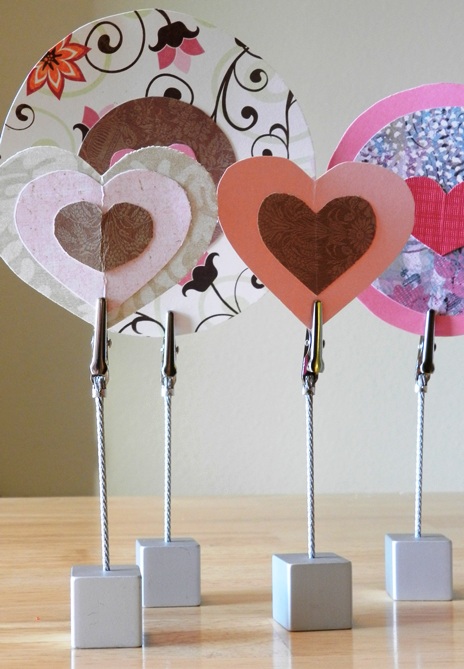
Hey everyone!  I've made a few more decorations for Valentine's day!

I've had these photo clips hanging out in my decorations box, unused and unloved for many years.  I re-discovered them as I put away the Christmas stuff and instantly new what I wanted to use them for....  paper hearts!


I think I'll be saving these hearts for years to come- they just make me happy!


Rabu, 04 Januari 2012

L.O.V.E Sign Tutorial

Since I've taken down my holiday decorations, my house is feeling pretty empty- does anyone else have that problem?!

To fix the problem I decided to get an early start on some Valentine's decorations.  That's a first!  I rarely decorate for Valentine's Day with anything more than some paper hearts in the window.

Since I'm still collecting frozen juice can lids,  I took some inspiration from my Lid Magnets, and made a lid L.O.V.E sign!  I just knew those lids had some more potential... and they did!


Here's the tutorial.....

Materials:
clean metal frozen juice can lids (4)
a hammer and a nail
scrapbook paper
letter stencils or stickers
modge podge
tacky glue
fishing line
ribbon

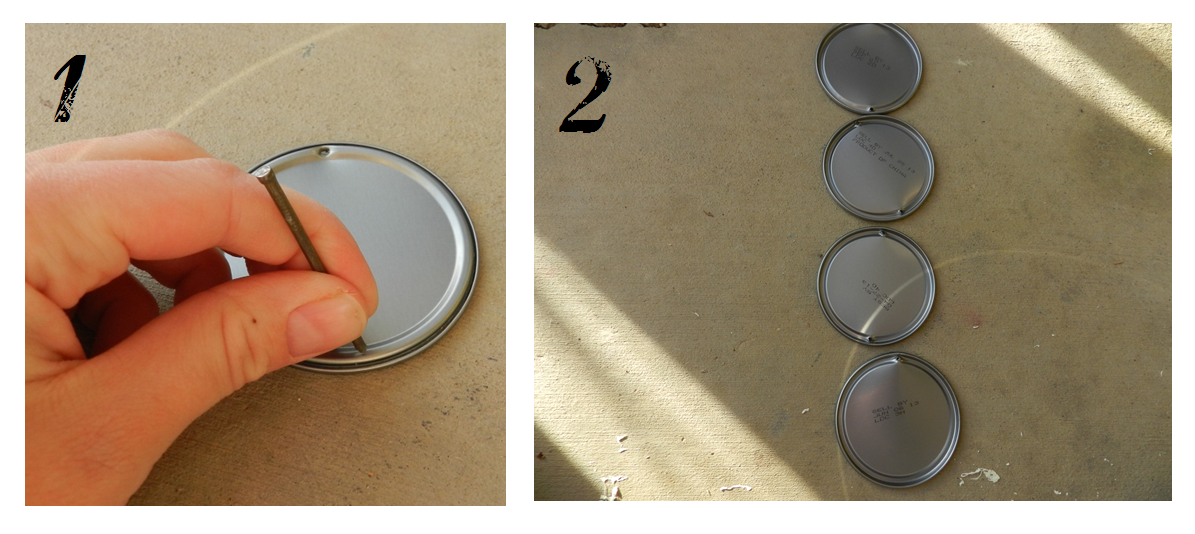
Step 1:  Place a lid facing down on a hard surface and hammer a small nail into the edge to make a small hole.  Hammer another small hole strait across from the first.

Step 2:  Repeat step 1 for 2  more lids.  Only hammer on hole for the 4th lid.

Step 3: Using a variety of patterned papers, cut out four small circles the size of the inside of the lids.

Step 4:  Place lettering for the letters L.O.V.E.  You can use stickers if you have them, but if not... stenciling works just fine!

Step 5:  Coat your lettered circles with modge podge and let dry.  Make sure not to let them stick to the newspaper while drying!  Note:  this step isn't exactly necessary, but I find it's nice to give them a coat of something to make the paper more water proof and durable.

Step 6:  Line up the lettered circles with the top of the letter next to one of the holes in the lid, and glue them to the lids with some tacky glue. 


Step 7:  Once again, this step is just for my personal preferences.  I stacked the lids together while the glue dried because the paper tends to curl up when I put glue on it.


Step 8:  Thread some fishing line through the top hole on the "L" lid.  Tie it together to make a small loop.


Step  9:  Tie fishing line through the bottom of the "L" lid and through the top of  the "O" lid and tie together to connect the lids.  Tie the remaining lids together to make a long chain reading L.O.V.E.


Step 10: Cut small strips of ribbon and tie them onto the fishing line at the top of the lid chain and in the spaces between the lids.


Hang it your sign up on your wall, door, or wherever and you're done!