Tampilkan postingan dengan label Kid Stuff. Tampilkan semua postingan

Selasa, 25 Juni 2013

Watermelon Hearts


One thing I look forward to every summer is the watermelon!  There are so many fun and tasty ways to enjoy it..... here's one that involves cookie cutters!
Materials:
Large Slice of Watermelon
Heart Shaped Cookie Cutter
Cutting Board

Step 1:  Place a large slice of watermelon on a cutting board and gently press a cookie cutter into the watermelon.

Step 2:  Take the cookie cutter out of the watermelon slice and remove the watermelon inside the cookie cutter.  Place the heart shaped watermelon on a plate and enjoy!


Selasa, 04 Juni 2013

Strawberry Smoothie Pops


My son LOVES popsicles and smoothies, so we've been experimenting!  I wanted to make something really tasty yet also healthy.  Here's what we came up with......


Strawberry Smoothie Pops


Ingredients:
1 1/2 cups vanilla yogurt
1/4 cup milk
Approximately 8 strawberries


Directions:   
Thoroughly blend all of the ingredients in a blender.  Pour the blended mixture into popsicle molds with handles or popsicle sticks and place them in the freezer for about two hours or until frozen.  

Note:  If you want creamier popsicles, try adding 1/2 cup more of yogurt to the mixture. 


Enjoy!

Kamis, 25 April 2013

Melted Crayon Art Tutorial


So, you may have seen some lovely melted crayon abstract art on canvas somewhere out there on the inter-webs.....  I have!  It inspired me to try out some melted crayon on paper with my son.


Here's a little tutorial for ya, so you can go make your own Melted Crayon Abstract Art with your kids, your spouse, your friends...... whoever!

Materials:
Paper
Masking Tape
Crayons
Hair Dryer

Step 1:  Lay out some paper (I used 90 lb drawing paper because it's a little more durable, but regular computer paper will work too) and tape it down to a table or board. This will make a nice border and keep the paper in place for the next steps.


Step 2:  Start coloring and scribbling with the crayons.  This is supposed to be abstract, so don't worry about making it look like something.  Just go with the flow.  You can even get the kids involved with this part.


Step 3:  Start melting some crayon wax on your paper by blowing a hair dryer on high heat on the tip of the crayon (this part should not be done by children).  Be careful not to blow that heat directly on your fingers or hands... that can hurt. You can wear gloves or even hold the crayon with some tongs if you want.

It takes a few seconds for the crayon wax to melt enough to start dripping, but once it gets to that point, let it drips and flow on your paper.  You can hold the blow dryer right next to the melted wax on the paper to blow it in different directions.


Step 4:  Continue melting wax and doodling all over paper until you feel like you're done.  You can do as many layers as your paper can take!  Have fun with it!


Step 5: After the crayon wax is all cooled, gently pull the tape off the edges and admire your abstract crayon work!


Kamis, 11 April 2013

Printing with Flowers


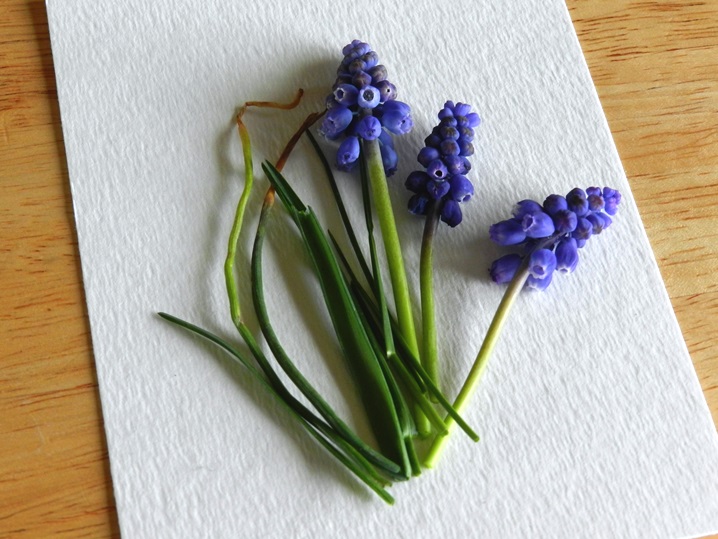
Grape Hyacinths..... so pretty, but so invasive.  These little bulb flowers were once planted in flower beds and are now all over our front lawn.

 Good thing I came up with a fun art project to put these to use!  My son had a great time smashing flowers with me :)


Materials:  
Flowers, grass, weeds- whatever kinds you like
heavy weight paper- I used 300lb watercolor paper
a sheet of regular printer paper
hammer (optional)

Step 1. Gather up and wash some flowers and grasses.  Just to make sure they will work on your nice paper, test them out on some scrap paper first.  I couldn't get leaves to work with this method, but try whatever you like!


Step 2:  Arrange your flowers and grasses on your nice heavy weight paper.


Step 3:  Place a regular sheet of printer paper on top of your arrangement- you can fold your printer paper in half if you like.


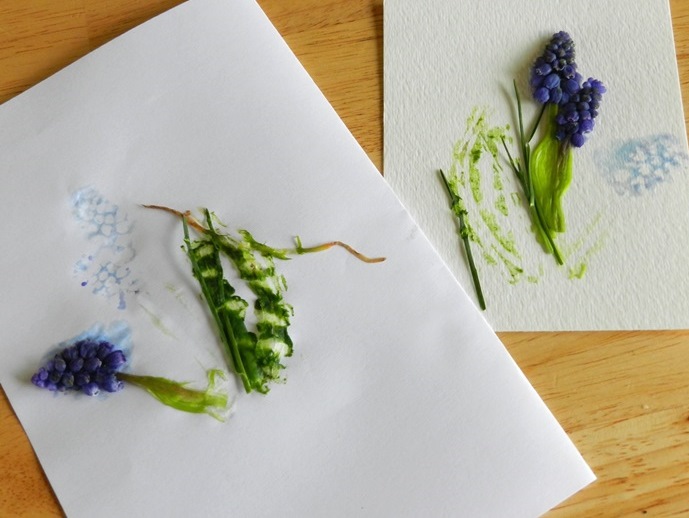
Step 4:  Without moving your flower arrangement, press the printer paper on top of it carefully, making sure to squish the juices and natural dyes out of the plants.  This is where you might need a hammer.  The grape hyacinths pressed easily with my fingers, but I had to pound the grasses to make any marks on the paper.


Step 5:  Lift the printer paper off and see the prints you made with the dyes of the flowers.  Remove the smashed plants and repeat the previous steps to add more to your artwork, if desired.  


Step 6: Some plant remnants may still stick to your paper, so let it dry and then scrape off the extra stuff.


Yea!  You're all done.  You can frame your artwork or make custom cards out of them!


Selasa, 15 Januari 2013

Watercolor Resist Valentine's Cards


Last week my son and I experimented with watercolors and crayons to make some crayon resist Valentine's Cards!  They may look a bit amateur- ish, but they were fun to make!  Plus, nothing beats a home made Valentine's card :)

Here's a simple tutorial I put together for you:


Materials:
white card stock or watercolor paper
white crayon
watercolor paints
paint brush

Step 1:  Draw a design or write a Valentine's message on the front of a folded piece of white card stock or watercolor paper.  This is kinda hard to do because you can't see very well what you are drawing or writing.


Step 2: Load up some watercolor paints on a paintbrush and paint over the area you just drew on with with crayon to see your design come to life!


Step 3:  Let the paint dry and add any other embellishments you like.


Kamis, 03 Januari 2013

ABC Board Art Hanger

I love the art of children.  It's so honest and unpremeditated.  While it doesn't always make sense to adults, it's an amazing tool that children use to make sense of their world.  I love watching my son draw for that reason.  We talk while he draws and it's amazing to see his imagination coming to life.  

 I find children and art fascinating. I could go on about that forever, but I will spare you.  On to my latest art-related project:  
THE ABC BOARD ART HANGER!


My son has an ever growing collection of drawings/ sticker/ pom pom creations and my fridge space is limited.  We needed something he could hang in his room to display his work.... and I thought I'd try to make it educational too by putting the alphabet on it.  


I took one of the boards that were left over from our new fence and gave it a coat of primer.  Once that dried, I spray painted it this lovely happy green color... my fav!  Next I did a lot of stencil work.  I don't own a cricut or any machine of that sort, so made my own designs by hand and traced them out.  It took quite a while.

Once I had all the stencils painted in I gave it a nice coat of varnish.  Then I glued the clothespins on.  And wala!  A beautiful and handy art hanger!  This really brightens up the little guy's room.  

Selasa, 01 Januari 2013

A Look at my Sketchbook

 Happy 2013!  I think I'll start off the new year with a few sketches of my favorite little boy.

I hardly ever sketch this kid live. He moves much much too fast.  So I usually sketch from photos.

I love my little boy and I love reading him stories!  I am constantly inspired by the beautiful illustrations in children's books.

These leaf drawings were inspired by a book called Grandpa Green, a really cute book about a gardening grandpa who makes sculptures from bushes in his yard that tell the stories of his life.  The illustrations are amazing!  I may attempt a watercolor along these lines in the future :)


Selasa, 27 November 2012

Crochet Bear Hats

I made these little bear hats for my soon-to-be-born nephews....and now that the baby shower is over I can post them :)


The pattern comes from Easy Make Me Happy blog and it's a free one!  Yea! It's actually for monkey hats, but I just changed the location of the ears to make them bears instead... I like them better that way :)


I can't wait to see these on my nephews one day!


Rabu, 14 November 2012

Mini Paper Plate Diorama

A little something we did before the big snow storm hit us last week...

Our neighbor was making a diorama for school and my little guy was dying to make one too.  So we whipped one out that night.  Nothing too fancy, but still fun!  Clippings from our bushes make perfect mini-trees  :)