Tampilkan postingan dengan label Spring. Tampilkan semua postingan

Jumat, 19 April 2013

Watercolor Butterflies

My latest, happy little butterflies.....


This time I tried painting them more wet on wet and I'm really happy with how they turned out.  Watercolors are the perfect medium to paint butterflies!  They let you show the translucence of the wings better than other paints.


The  Blue Morpho Butterfly is my favorite... I guess you now know where the image for my new blog header came from!  

Kamis, 11 April 2013

Printing with Flowers


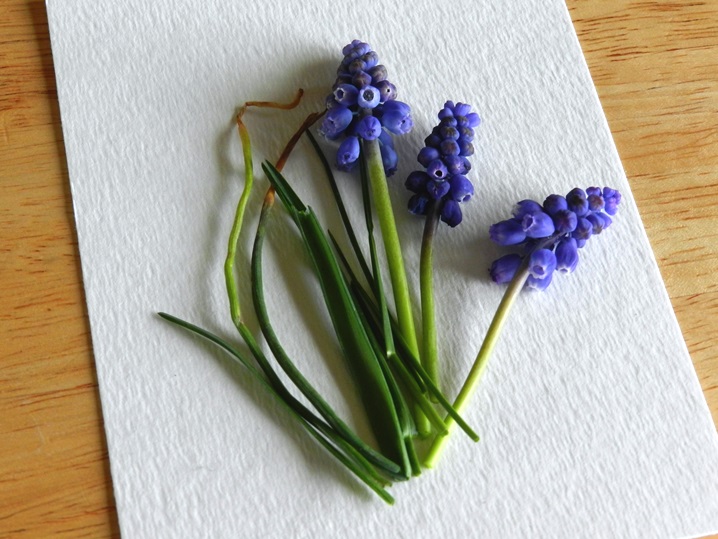
Grape Hyacinths..... so pretty, but so invasive.  These little bulb flowers were once planted in flower beds and are now all over our front lawn.

 Good thing I came up with a fun art project to put these to use!  My son had a great time smashing flowers with me :)


Materials:  
Flowers, grass, weeds- whatever kinds you like
heavy weight paper- I used 300lb watercolor paper
a sheet of regular printer paper
hammer (optional)

Step 1. Gather up and wash some flowers and grasses.  Just to make sure they will work on your nice paper, test them out on some scrap paper first.  I couldn't get leaves to work with this method, but try whatever you like!


Step 2:  Arrange your flowers and grasses on your nice heavy weight paper.


Step 3:  Place a regular sheet of printer paper on top of your arrangement- you can fold your printer paper in half if you like.


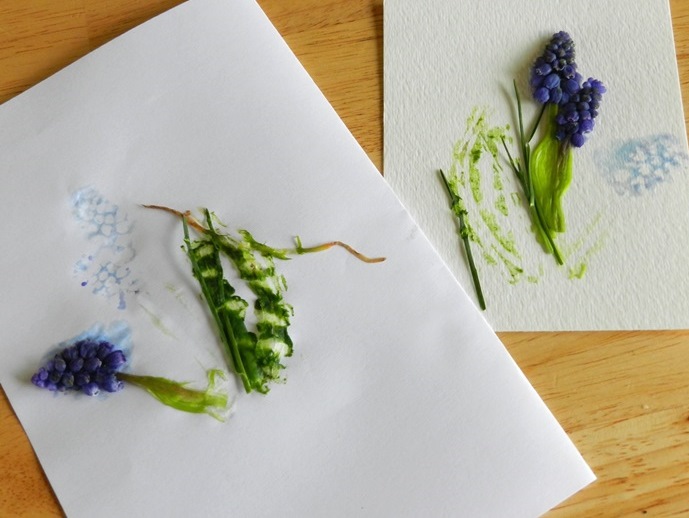
Step 4:  Without moving your flower arrangement, press the printer paper on top of it carefully, making sure to squish the juices and natural dyes out of the plants.  This is where you might need a hammer.  The grape hyacinths pressed easily with my fingers, but I had to pound the grasses to make any marks on the paper.


Step 5:  Lift the printer paper off and see the prints you made with the dyes of the flowers.  Remove the smashed plants and repeat the previous steps to add more to your artwork, if desired.  


Step 6: Some plant remnants may still stick to your paper, so let it dry and then scrape off the extra stuff.


Yea!  You're all done.  You can frame your artwork or make custom cards out of them!


Selasa, 26 Maret 2013

Crepe Paper Flowers


When I found a tutorial for crepe paper flowers involving watercolors HERE, I just had to try it.... I love almost anything to do with watercolors!


It seems like a simple concept: shaping wet petal shapes over a bowl, coloring them with watercolors, then drying them in the microwave, but for me, it was WAY harder than it seemed.  My flowers don't even come close the the ones from the original tutorial.  And, they took me WAY longer than I thought.   Plus my floral tape didn't hold, so I ended up hot gluing the petals together.  It was hard!

So ya, these look nice, but I think it would take more practice (and more time than I'm willing to spend) to get them looking great. 


At least they look alright on my table next to my Jackson Pollock eggs for now :)


Selasa, 12 Maret 2013

Jackson Pollock Eggs Tutorial


Have you ever tried blowing eggs?  I love the idea!  You can save your eggs for a long time that way.  It does take some work though.  About half of mine cracked, but luckily I was able to cover that up with a little acrylic paint :)

Here's a quick tutorial on how I decorated my first ever blown eggs!


Materials: 
Blown eggs: washed and dried ( You can find a good tutorial on blowing eggs HERE )
Acrylic craft paints
paint brush and/or foam brush
paint pallet or paper plate
paper towels

Step 1:  On a paper plate or paint pallet, pour small amounts of acrylic craft paint and mix colors to get desired base color.  I used a medium blue, white, and bright green for my base colors.

Step 2:   Using a foam brush, paint the base color(s) over one half of the eggs.  Let dry and then paint the other half and let dry completely.  You can paint one smooth color or blend in other colors to get a more varied look.


Step 3:  Lay eggs out on paper towels.  Cover your work area well... this gets messy! Load up a paint brush with the paint color of your choice.  Hold the paint brush in one hand next to the eggs and with a finger, flick the tip of the brush to splatter the paint onto the egg- Jackson Pollock style!


Step 4:  Let each side of the eggs dry before turning them over to flick paint on the other sides.  Then let dry completely.  Your'e done!