Selasa, 30 April 2013

Thrifted Mirror Make-Over with a Mustache

Hey guys!  I have a fun post up today that I originally guest posted at Chic On A ShoeString Decorating a few weeks ago.


Here's a little before and after thrift store find.  Check out this mirror I found for $2!

After covering the glass with paper and masking tape (that was seriously the hardest part)  I gave it few coats of spray paint.  Amazing what a little aqua paint can do!  It's now hanging in my living room :)

My brilliant husband thought it would be cool to draw a mustache on it too......I love how his brain works!  I drew one with some window crayons (yes, they are washable) and let me tell you, it took MANY tries with my camera to get it lined up just right on my face....but I always knew I'd look cool with a twirly mustache :)


Senin, 29 April 2013

Photo of the Week


Yea! After weeks of cold and snow, spring has finally decided to come back to us!

I spent some time photographing the cherry tree blossoms at different times of day in different light.  This is my favorite shot.... it's in the morning as the sun's coming up.  It was a hard shot to get because I had to look into the sun, but I guess it was worth it!  It's so light and happy!

Kamis, 25 April 2013

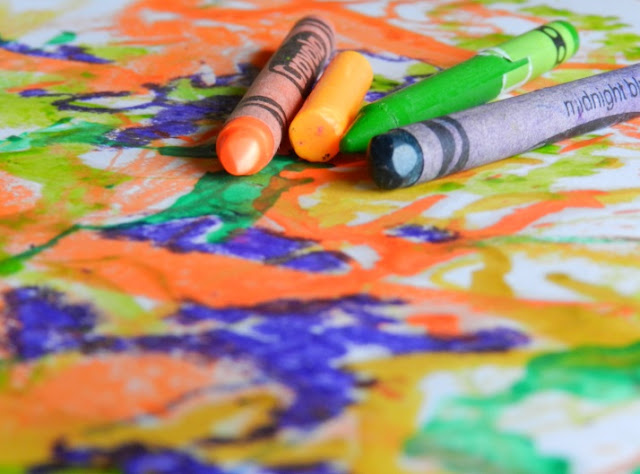
Melted Crayon Art Tutorial


So, you may have seen some lovely melted crayon abstract art on canvas somewhere out there on the inter-webs.....  I have!  It inspired me to try out some melted crayon on paper with my son.


Here's a little tutorial for ya, so you can go make your own Melted Crayon Abstract Art with your kids, your spouse, your friends...... whoever!

Materials:
Paper
Masking Tape
Crayons
Hair Dryer

Step 1:  Lay out some paper (I used 90 lb drawing paper because it's a little more durable, but regular computer paper will work too) and tape it down to a table or board. This will make a nice border and keep the paper in place for the next steps.


Step 2:  Start coloring and scribbling with the crayons.  This is supposed to be abstract, so don't worry about making it look like something.  Just go with the flow.  You can even get the kids involved with this part.


Step 3:  Start melting some crayon wax on your paper by blowing a hair dryer on high heat on the tip of the crayon (this part should not be done by children).  Be careful not to blow that heat directly on your fingers or hands... that can hurt. You can wear gloves or even hold the crayon with some tongs if you want.

It takes a few seconds for the crayon wax to melt enough to start dripping, but once it gets to that point, let it drips and flow on your paper.  You can hold the blow dryer right next to the melted wax on the paper to blow it in different directions.


Step 4:  Continue melting wax and doodling all over paper until you feel like you're done.  You can do as many layers as your paper can take!  Have fun with it!


Step 5: After the crayon wax is all cooled, gently pull the tape off the edges and admire your abstract crayon work!


Selasa, 23 April 2013

Crochet Collar


A while ago I tried something new with crochet... I made a collar!   It was much more simple than I thought it would be.  You can find the pattern HERE for free.


I'm not sure I'll actually wear this, even though I think it's pretty.  I like the vintage look, but I just don't know if it's me.   Maybe I need an elegant sweater to go with it.  But then again, how often do I wear anything elegant? ... haha!  Most days I live in t-shirts and comfy pants. Yep, I like to be comfortable, especially when I'm just hanging out at home :)


Senin, 22 April 2013

Photos of the Week

Happy Earth Day!

I have to do another post with multiple photos this week.  I was having waaaaaay too much fun with my camera and the grape hyacinth's I put in a vase.  They're so pretty close-up and they almost smell like lilacs!


These cheer me up every time I see them on my kitchen table.  I've needed it too... we've all been sick... yuck!  And the worst part is that we were hoping to finally take our vacation to CA, which we've been planning and saving for, for like... for-ev-er!   I wasn't sure I would be doing well enough with the migraines to go last weekend anyway, but a part of me was still hoping.  Oh well, we'll make it another time.  We'll just have to quarantine ourselves and be hermits for a while so we don't get sick again.. haha!

Jumat, 19 April 2013

Watercolor Butterflies

My latest, happy little butterflies.....


This time I tried painting them more wet on wet and I'm really happy with how they turned out.  Watercolors are the perfect medium to paint butterflies!  They let you show the translucence of the wings better than other paints.


The  Blue Morpho Butterfly is my favorite... I guess you now know where the image for my new blog header came from!  

Kamis, 18 April 2013

10 Nature Projects for Your Home

Is doing a round-up of your own projects allowed?  I use nature in creating art and beautiful things for my home a lot, so I thought I'd share all these ideas in honor of Earth Day!


Here are some Earth Friendly Projects you can try with natural materials you might find right out in your own backyard:

1. Decorative Stones : Use sharpies to draw on stones (or you could use rub-on tattoos if you don't draw) and finish with a coat of modge podge for some fun home decor.


2. Love Rocks:  Draw or paint hearts on rocks and leave around your home or the neighborhood to spread some love.

3. Paper Punched Leaves:  Use paper punches on leaves to make fun cutouts for art or card-making projects.

4. Sharpie Decorated Leaves:  Trace natural outlines on leaves with sharpies to make some leaf art.

5.  Fruit Printing:  Use fruit and watercolors to make fun fruit print cards or art.

6.  Flower Printing:  Use flowers, grass, and other plants to make some fun art.

7.  Pineapple Top Centerpiece:  Save the top of your pineapple for your table centerpiece.

8.  Natural Spring Wreath:  Use vines and acorns to decorate for spring.

9.  Painted Birdhouse Gourds:  Transform ordinary birdhouse gourds into works of art with acrylic paints.

10.  Mini Paper Plate Diorama:  Use leaves, rocks, branches and dirt to make fun dioramas with the kids.


Selasa, 16 April 2013

A Look at my Sketchbook: Arrows

I've been doodling a lot in my sketchbook and have tons to catch up on.   I've been  busy creating... my favorite thing to do!

We'll start with my arrow sketches.  My husband says this one reminds him of transformers...haha!  That is not what I had in mind when I drew it, but I have to agree with him..... maybe it's the colors... or the stripes.


And then I drew a much more muted version of arrows.  This may be material for a watercolor painting someday.  We'll see :)


Senin, 15 April 2013

Photo of the Week


Of all the things happening in the spring, my favorite to see are the blossoms!  I get so much joy from taking photos of them, smelling them, and just looking at them :)

I just read something really great last night.  I had heard this before, but had forgotten it.
 " As you take the normal opportunities of your daily life and create something of beauty and helpfulness, you improve not only the world around you but also the world within you." -Dieter F. Uchtdorf

Reading this reminded me of why I love to create so much.  I can't explain how much it has lifted me and gotten me through tough times.  It has helped me to truly be thankful for and find joy in the small things in life..... like cherry blossoms.

Kamis, 11 April 2013

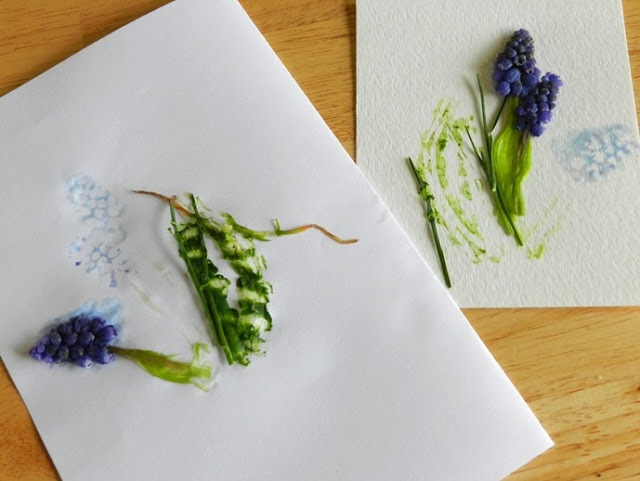
Printing with Flowers


Grape Hyacinths..... so pretty, but so invasive.  These little bulb flowers were once planted in flower beds and are now all over our front lawn.

 Good thing I came up with a fun art project to put these to use!  My son had a great time smashing flowers with me :)


Materials:  
Flowers, grass, weeds- whatever kinds you like
heavy weight paper- I used 300lb watercolor paper
a sheet of regular printer paper
hammer (optional)

Step 1. Gather up and wash some flowers and grasses.  Just to make sure they will work on your nice paper, test them out on some scrap paper first.  I couldn't get leaves to work with this method, but try whatever you like!


Step 2:  Arrange your flowers and grasses on your nice heavy weight paper.


Step 3:  Place a regular sheet of printer paper on top of your arrangement- you can fold your printer paper in half if you like.


Step 4:  Without moving your flower arrangement, press the printer paper on top of it carefully, making sure to squish the juices and natural dyes out of the plants.  This is where you might need a hammer.  The grape hyacinths pressed easily with my fingers, but I had to pound the grasses to make any marks on the paper.


Step 5:  Lift the printer paper off and see the prints you made with the dyes of the flowers.  Remove the smashed plants and repeat the previous steps to add more to your artwork, if desired.  


Step 6: Some plant remnants may still stick to your paper, so let it dry and then scrape off the extra stuff.


Yea!  You're all done.  You can frame your artwork or make custom cards out of them!