Kamis, 29 Desember 2011

Beach Scene


Did you know there was such a thing as a paint-able wall heater?  Well, I sure didn't- not until my mother-in-law asked me if I could paint hers for her bathroom!  It's called an eco-heater and I think it's made out of ceramic tile, but I'm not completely sure.  If I ever need to have a wall heater in my home, I will get one of these!

The beach scene I painted should go well with her ocean-themed bathroom.  The only part I'm not so happy about is the white circular dial in the corner.   That part is plastic, so I wasn't sure I could paint on it. 

Selasa, 27 Desember 2011

Watercolor Landscapes


Well, I'm back to blogging after taking a nice little break for Christmas.  I hope you all had a wonderful Christmas!

I was going to share the most recent birdhouse gourd I painted for someone for Christmas, but I didn't finish it until Christmas Eve and forgot to take pictures before I gave it away- sigh.  This gourd was the hardest one to paint.  It was a prairie scene with a windmill and trees.  I had such a hard time getting it done, but I finished it and was happy... until the person it was being given to decided not to join us for Christmas.  That was disappointing.  So the gourd was left there and I still don't know if it is liked or appreciated so I think I'm taking a break from gourd painting for a while.

So... onto happier things..... watercolor landscapes! These three scenes I painted years ago: two while I was in college and the other while my husband was still in college.  I have all three hanging up in my bedroom and they never cease to bring me joy :)


Kamis, 22 Desember 2011

Grey Crochet Earmwarmer


So, I ran across a couple more free patterns for crochet ear-warmers and of course, I HAD to try one out! These patterns are much cuter than the one I came up with a few months ago.  Nothing can beat the shell stitch with crochet- it's my favorite :)

I actually used two separate patterns to create this ear-warmer.  The pattern for the band comes from
 tangledhappy.com.

The pattern for the flower comes from Melody Maria Fulone on Ravelry.com.  Check out her Cozy Flowered Headband.  I haven't tried out the headband part yet, but the flower pattern is awesome!


And since I won't be posting again until next week, I wish you all a very Merry Christmas!

Selasa, 20 Desember 2011

A Look at my Sketchbook


I'm still struggling to get those birdhouse gourds painted for Christmas, even though I only have a few days left to do it- yikes!   So for now, I'm leaving you with a sketch from last summer.  I was sitting on a beach in San Diego at sunset and it was heavenly.  I can't wait to go back someday!

Sabtu, 17 Desember 2011

Three of a kind ornaments


Well, here it is.... proof that I did finally make something this week.

I bought some mini styrofoam balls at the dollar store and covered them with left over craft stuff with the help of some hot glue.   At first I tried spray painting one and that did not go well.  Spray paint actually dissolves styrofoam- who knew?


Rabu, 14 Desember 2011

Carmel Corn


This delicious treat is brought to you by my husband, since I have failed to make anything of consequence this week.  I have some more gourds to paint for Christmas gifts, but I am seriously lacking motivation.

So check out this recipe for My Amish Friend's Caramel Corn found at allrecipes.com.   It takes some time to make, but it is really yummy- especially when your husband makes it for you :)  I love that guy!


Sabtu, 10 Desember 2011

Pine Cone Garland Tutorial


I love pine cones!  They are beautiful, free (if you live any where near pine trees) and are great for decorating.  Here's one idea I came up with to put pine cones to use for the holidays.

Pine Cone Garland Tutorial

Materials:
Pine Cones, washed and dried
String
Ribbon
Spray Paint
Push Pins

Step 1:  Cut a long piece of string and wrap one end around a pine cone.  Tie it off leaving a little tail at the end.


 Step 2:  Continue wrapping pine cones down the length of the string leaving even spaces in between. Tie a knot around each pine cone to hold them in place.  When you get to the last pine cone, leave another little tail at the end.


Step 3:   Grab your paint and beautify your pine cones. I used some gold metallic spray and it looks ama-zing on pine cones!


Step 4: Cut small strips of ribbon and tie them in bows or knots in between each pine cone on your garland.


Step 5: Hang your garland on your walls, hearth, or wherever you like.  I tied little knots at each of the ends and stuck them with push pins to hang on the wall.


Happy decorating and Happy Holidays!

Selasa, 06 Desember 2011

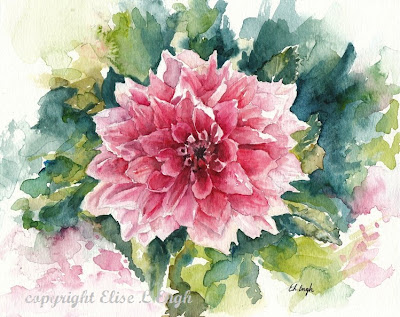
Pink flowers make me happy


This painting makes me happy! Well, pretty much all flowers make me happy, but I'm even happier when I can capture one in a painting.  Especially since flowers are kind of scarce this time of year.


You can also check it out at my Etsy Shop.... yep, it's for sale!

Sabtu, 03 Desember 2011

When I see fruit

 When I see fruit... my first thought is not to eat it (although I love fruit).  My first thought is to paint it!
Call me weird, but I actually pick through the pears at the grocery store to find the ones with the best shapes and colors.  And then once I get them home, I don't want to eat them right away.  I've had many pears go almost rotten because I didn't want to eat them until I had painted them.  I guess I'm hopeless.  I think about painting stuff A LOT.  It's my passion!

So enjoy more delicious fruit paintings by me :)
 

My first attempt at painting an orange in watercolor....


And yet another pear... I think I've painted at least 10 of these now.


Kamis, 01 Desember 2011

Painted Birdhouse Gourds


I've been working on a few gifts for family.... painted birdhouse gourds! 

I painted some with my family earlier this fall (check them out here), but this time I got my husband to drill holes in them so that they can be used for actual birdhouses. 


With a little acrylic paint and a final coat of polyurethane, I think they turned out quite nicely :) 


Senin, 28 November 2011

Photo of the Week


Greetings! 
I'm back from a trip to Southern Utah and I have a photo to share- yay! I don't get many good shots with my husband's little point-and-shoot camera, but a little photo editing helps.  I'm hoping to get back into photography soon.  I have a feeling I might get a new camera for Christmas ;)

Selasa, 22 November 2011

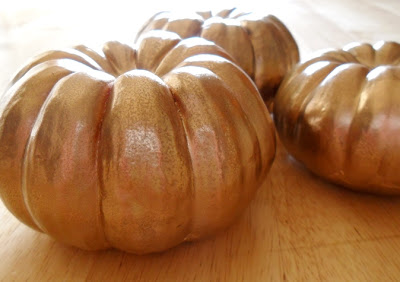
Metallic Pumpkins

I know it's a bit late to be decorating pumpkins, but I bought this gold metallic spray paint and I just had to test it out.  The stuff turned out to be AMAZING! I can't wait to get spray painting some pine cones with it for Christmas!

I bought these mini pumpkins way back at the beginning of October and they are showing no signs of rot yet.  My son and I "decorated" these little guys for Halloween.

Here is the before:


And the after:

I may have to keep these around after Thanksgiving too :)


Rabu, 16 November 2011

Crochet Infinity Scarf


 So, I found a great crochet pattern for a scarf using a variation of a shell stitch in Reader’s Digest  “Crochet in No Time”  at my library, but I wanted to change it a little bit.  I made my own variation by joining the ends to make an infinity scarf!  Yea! Just in time for winter too :)


Jumat, 11 November 2011

Sketches of the litte guy


Here are a few sketches of the little guy I spend all day with- everyday!   I've been sketching from photos of him to get in some drawing practice and man am I out of practice- yikes!   Back in my college days when I was taking figure drawing classes, this would have been much easier.

I got a little frustrated with this drawing here below.  It is easy for me to draw a person, but it is soooooo hard to actually make the drawing look like them.  This has some resemblance to my son, but there is something about the eyes that makes him look different.  I  admire any artist who can really capture a person as they are. 


Rabu, 09 November 2011

Straw Painting Art Tutorial


Well, hello everyone! I hope you are ready for another abstract watercolor tutorial!  I just love doing these.  I think what I like most is (hopefully)  inspiring others and helping them to discover that they can be creative :)


Materials:
Watercolor Paper
Watercolor paints and brush
Straw
Stiff board to tape your paper too (optional)
Masking Tape (optional)

Step 1: If you would like a nice border around your painting, tape your watercolor paper down to a board with masking tape. 
                

Step 2:  Choose your color palette for your painting.
If you aren't quite sure how to go about this you can pick colors that are next to each other on the color wheel.  You could do: yellow, green, blue or red, orange yellow.


Step 3:  Load up your paint brush with some nice water-loaded watercolor paint.  You need the paints to be really runny for the straw technique to work.

Step 4:  Drop some wet watercolor paint onto your paper and blow the paint around with a straw.

  You can drip paint randomly all over your paper or try a more planned technique.  For this painting here, I dripped the paint most heavily at the bottom of the paper and blew it upwards with the straw.  You could also try dripping your paint in the center of the page and blowing it outwards in all directions.  Just experiment and have fun!


Step 5:  Continue to drip more paint onto your paper, alternating colors as you go.  You can drip layers onto other wet drips or wait till the first drips dry.  I did a little of both.  If you drip wet paint into wet paint you can watch the colors mix on the paper!  I find this fascinating!


Step 6.  Keep layering until you are satisfied with the look of your painting, then let it dry completely.  A blow dryer will speed up the process, but be careful.  The air from the blow dryer may move your wet paint around.


Step 7:  Carefully peel off the masking tape from the edges of your painting.  Go slowly- the tape tends to rip the paper if you're not careful.


Sign your painting and enjoy your new abstract artwork!

For another abstract art idea, check out my Abstract Watercolor Tutorial.