Tampilkan postingan dengan label Decorating. Tampilkan semua postingan

Selasa, 23 Juli 2013

Messy Frames Tutorial

So....... usually I'm painting stuff to put in frames, but this time I played with painting the frames themselves!

This is such a simple and quick project.  Only two steps and you're done!

Materials:
picture frames- preferably white ones
acrylic craft paints
paint brush
water

Step 1:  Paint stripes or dots or whatever other design you like on your frames in multiple colors.  Let dry for a few minutes.  The more you let the paint dry, the harder it will be to rub back in the next step.

Step 2:  Holding the painted frame under running water in the sink, gently rub off some of the paint you just applied.  It's up to you how much paint you want to rub off.   Lay out to dry.

You're all done!  See.... I told you this a was a quick one!  All you have left to do is find the right stuff to fill your frames with.  I went for some old watercolors from my "mess-ups" pile.  Now I have some bright and cheery decor for my art room :)

Kamis, 11 Juli 2013

Summer Flower Pillow and another Free Crochet Pattern

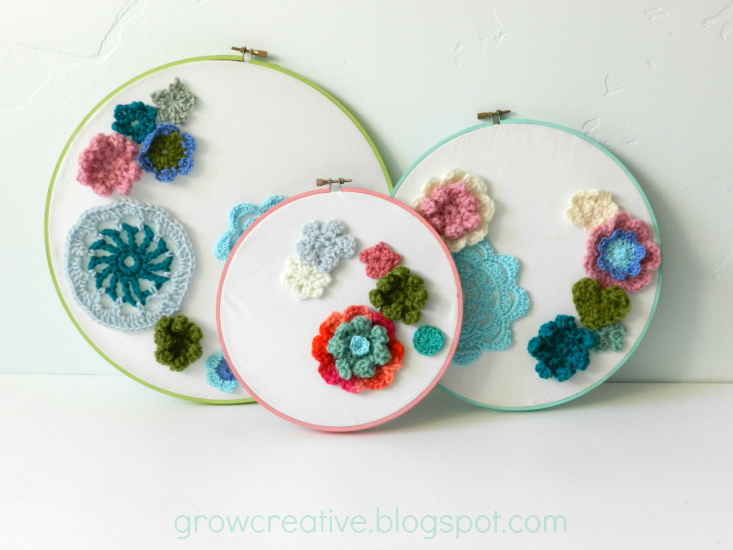
I've been experimenting with my Summer Flower Motif Pattern and came up with a larger version to decorate a pillow with......

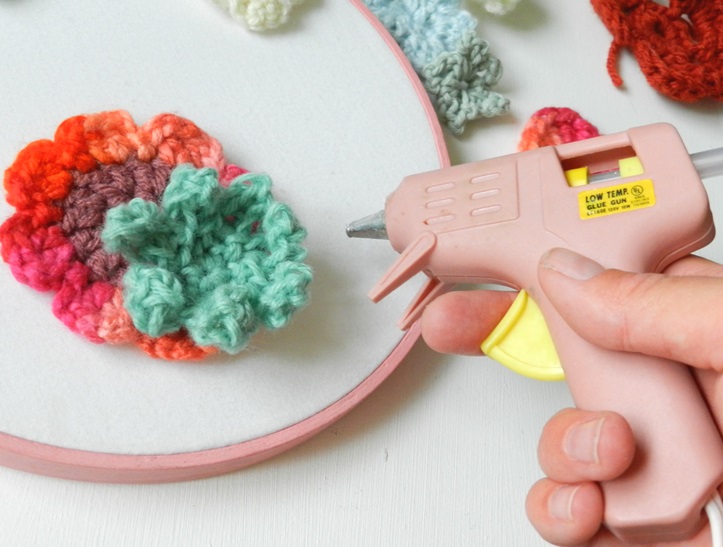
The first part of this pattern is identical to my last flower motif, but I added two extra rounds on the end. You can download a PDF of this pattern for free here......
                          (Copyright Elise Engh 2013:  Please do not distribute this pattern as your own)

Or you can check it out below.....

Materials:                     Any yarn of choice
                                      Any size crochet hook
                                      Darning needle
Abbreviations:          ch = chain
         sl st = slip stitch
                                      sc = single crochet
                                      hdc = half double crochet
                                      dc = double crochet
         st = stitch
         sts = stitches

Round 1: ch 12, sl st into first ch to form a ring.
Round 2: ch 1, work 18 sc into ring, sl st in first sc to join.
Round 3:  ch1, sc in same st as last sl st, *ch 3, skip next sc, sc in next sc, repeat from * around 8 more times, ending in ch 3, sl st in first sc.  (9 loops for petals)
Round 4: sl st into next ch 3 space, ch 1, work (sc, hdc, dc, hdc, sc) in same space for petal.  *(sc, hdc, dc, hdc, sc) in next ch 3 space, repeat from * around 7 times (work in new color of yarn before the join, if desired), join with sl st in first sc. (9 petals)
Round 5:  *ch 6, skip next 4 sts, sc in next st (space between petals).  Repeat from * around 8 more times.   (9 petal loops)
Round 6:  sl st in next ch 6 space, ch 1, work (sc, hdc, 3dc, hdc, sc) in same space for petal.  * (sc, hdc, 3dc, hdc, sc) in next ch 6 space.  Repeat from * around 7 times,  (work in new color of yarn before the join, if desired) join with sl st in first sc. (9 petals)
Round 7:  *Ch 8, skip next 6 sts, sc in next st (space between petals).  Repeat from * around 8 more times.  (9 petal loops)
Round 8:  Sl st into next ch 8 space, ch 1, work (2sc, 2 hdc, 3 dc, 2 hdc, 2 sc) into same space for petal.  *(2 sc, 2 hdc, 3 dc, 2 hdc, 2 sc) into next ch 8 space.  Repeat from * around 7 times.  Join with sl st in first sc.  (9 petals)
Round 9:  *Ch 10, skip next 10 sts, sc in next st (space between petals), repeat from * around 8 more times.  (9 petal loops)
Round 10:  Sl st into next ch 10 space, ch 1, work (2sc, 2hdc, 8dc, 2hdc, 2sc) into same space for petal.  *(2sc, 2hdc, 8dc, 2hdc, 2sc) into next ch 10 space.  Repeat from * around 7 times.  Join with st st in first sc. (9 petals)
Fasten off and weave in ends.


Selasa, 09 Juli 2013

Crochet Flower Embroidery Hoops

I've discovered another use for crochet flowers...

This is such a girly way to decorate and I love it!  I have one room in the house that I can make as girly as I want and that is my art room, so that's where these crochet flower embroidery hoops will stay :)

Check out the tutorial to get started with making your own:

Materials:
Embroidery Hoops
Acrylic Craft Paint
Paint Brush
Fabric- enough to cover your embroidery hoops
Hot Glue Gun with Hot Glue Sticks
Crochet Flowers -I made my flowers from the patterns below:
Seven Petal Crochet Flower
Crochet Sea Pennies
Mini Crochet Flowers
Seven Petal Daisy
9 Petal Summer Flower Motif


Step 1:  Paint the outsides of the outer rings of the embroidery hoops with acrylic craft paint and let dry.

Step 2:  Cut out fabric to fit the embroidery hoops.  Cut the fabric large enough to fit inside the hoops and fold over the undersides.

Step 3:  Place the fabric on the inner hoop and place the outer hoop on top, screwing it tight to hold.  Then hot glue the edges to the inner hoop underneath.

Step 4:  Arrange crochet flowers on the front of the hoops and hot glue them in place. Pretty Simple!

Jumat, 14 Juni 2013

Soda Pop Vases


Ok, so using old bottles as vases is not a new idea, but I think my Alliums look amazing in the soda pop bottles I saved from last Christmas. 

 These flowers were a happy surprise that popped up in my back yard this year.  They didn't come up last year when we first bought this house, so I had no idea they were there.  Sweet!  I wish that would happen more often :)

Selasa, 11 Juni 2013

Thrifted Breakfast Tray Makeover


Are you one of those people that love having breakfast in bed?  I am, for sure! 

 I had been hunting for a breakfast tray for just such a reason, when I found this one at the thrift store (sorry I didn't take a before photo).  It was brown with some sad looking patterned paper modge-podged to the bottom.  I had to rescue it and claim it for my own.... and it only cost $4!


I ripped off the old paper, sanded it, and repainted it with the left-over paint from my art room.  Then I free-handed a flower design in acrylic paints, sanded some paint back,  and finished it off with some polyurethane.  I've already put this to good use for breakfast and my son likes to take it out in the backyard for picnics too!


Jumat, 07 Juni 2013

Back in the Art Room


My art room is finally fixed up (mostly) so we had some fun taking photos in the newly painted room!  After our shower leak fiasco, we had to put in new dry wall and paint.  I chose a very light aqua color, which I can't get enough of.  I love having my space back!

It's not completely organized and decorated yet, but this is what I've got so far:


I have many (too many in fact) projects in the works, some of which include attempting to actually sew a wearable piece of clothing and refinish some furniture!  It's going to be an adventure for sure!


Selasa, 28 Mei 2013

Handmade Vacation Souvenirs


I've never been the type to spend lots of money on vacation souvenirs...... I'm kinda cheap like that.  So this time, we decided to make our own souvenirs!  I picked up a few stones from Ocean Beach and brought them home.

We washed them and painted scenes from our vacation on them with acrylic paints, then labeled them on the back!  It's a fun way to remember all the good times we had and the beautiful ocean!  


This one is supposed to be a peacock feather, if you can't tell... haha!  I loved seeing the peacocks run wild at Irvine Park!  They're gorgeous!


Selasa, 30 April 2013

Thrifted Mirror Make-Over with a Mustache

Hey guys!  I have a fun post up today that I originally guest posted at Chic On A ShoeString Decorating a few weeks ago.


Here's a little before and after thrift store find.  Check out this mirror I found for $2!

After covering the glass with paper and masking tape (that was seriously the hardest part)  I gave it few coats of spray paint.  Amazing what a little aqua paint can do!  It's now hanging in my living room :)

My brilliant husband thought it would be cool to draw a mustache on it too......I love how his brain works!  I drew one with some window crayons (yes, they are washable) and let me tell you, it took MANY tries with my camera to get it lined up just right on my face....but I always knew I'd look cool with a twirly mustache :)


Selasa, 26 Maret 2013

Crepe Paper Flowers


When I found a tutorial for crepe paper flowers involving watercolors HERE, I just had to try it.... I love almost anything to do with watercolors!


It seems like a simple concept: shaping wet petal shapes over a bowl, coloring them with watercolors, then drying them in the microwave, but for me, it was WAY harder than it seemed.  My flowers don't even come close the the ones from the original tutorial.  And, they took me WAY longer than I thought.   Plus my floral tape didn't hold, so I ended up hot gluing the petals together.  It was hard!

So ya, these look nice, but I think it would take more practice (and more time than I'm willing to spend) to get them looking great. 


At least they look alright on my table next to my Jackson Pollock eggs for now :)


Selasa, 12 Maret 2013

Jackson Pollock Eggs Tutorial


Have you ever tried blowing eggs?  I love the idea!  You can save your eggs for a long time that way.  It does take some work though.  About half of mine cracked, but luckily I was able to cover that up with a little acrylic paint :)

Here's a quick tutorial on how I decorated my first ever blown eggs!


Materials: 
Blown eggs: washed and dried ( You can find a good tutorial on blowing eggs HERE )
Acrylic craft paints
paint brush and/or foam brush
paint pallet or paper plate
paper towels

Step 1:  On a paper plate or paint pallet, pour small amounts of acrylic craft paint and mix colors to get desired base color.  I used a medium blue, white, and bright green for my base colors.

Step 2:   Using a foam brush, paint the base color(s) over one half of the eggs.  Let dry and then paint the other half and let dry completely.  You can paint one smooth color or blend in other colors to get a more varied look.


Step 3:  Lay eggs out on paper towels.  Cover your work area well... this gets messy! Load up a paint brush with the paint color of your choice.  Hold the paint brush in one hand next to the eggs and with a finger, flick the tip of the brush to splatter the paint onto the egg- Jackson Pollock style!


Step 4:  Let each side of the eggs dry before turning them over to flick paint on the other sides.  Then let dry completely.  Your'e done!